
My husband was in Vietnam in April, with his siblings. So I decided to give our kitchen an overhaul.
Last time my husband was out of the country with his siblings in Africa, I remodeled our fireplaces. My husband must always wonder what I am going to change when he leaves town. 😀
I had been wanting to paint our tired, honey colored kitchen cabinets for more than a year. Since my husband was gone for 10 days I decided it was the perfect time to give the kitchen a facelift.

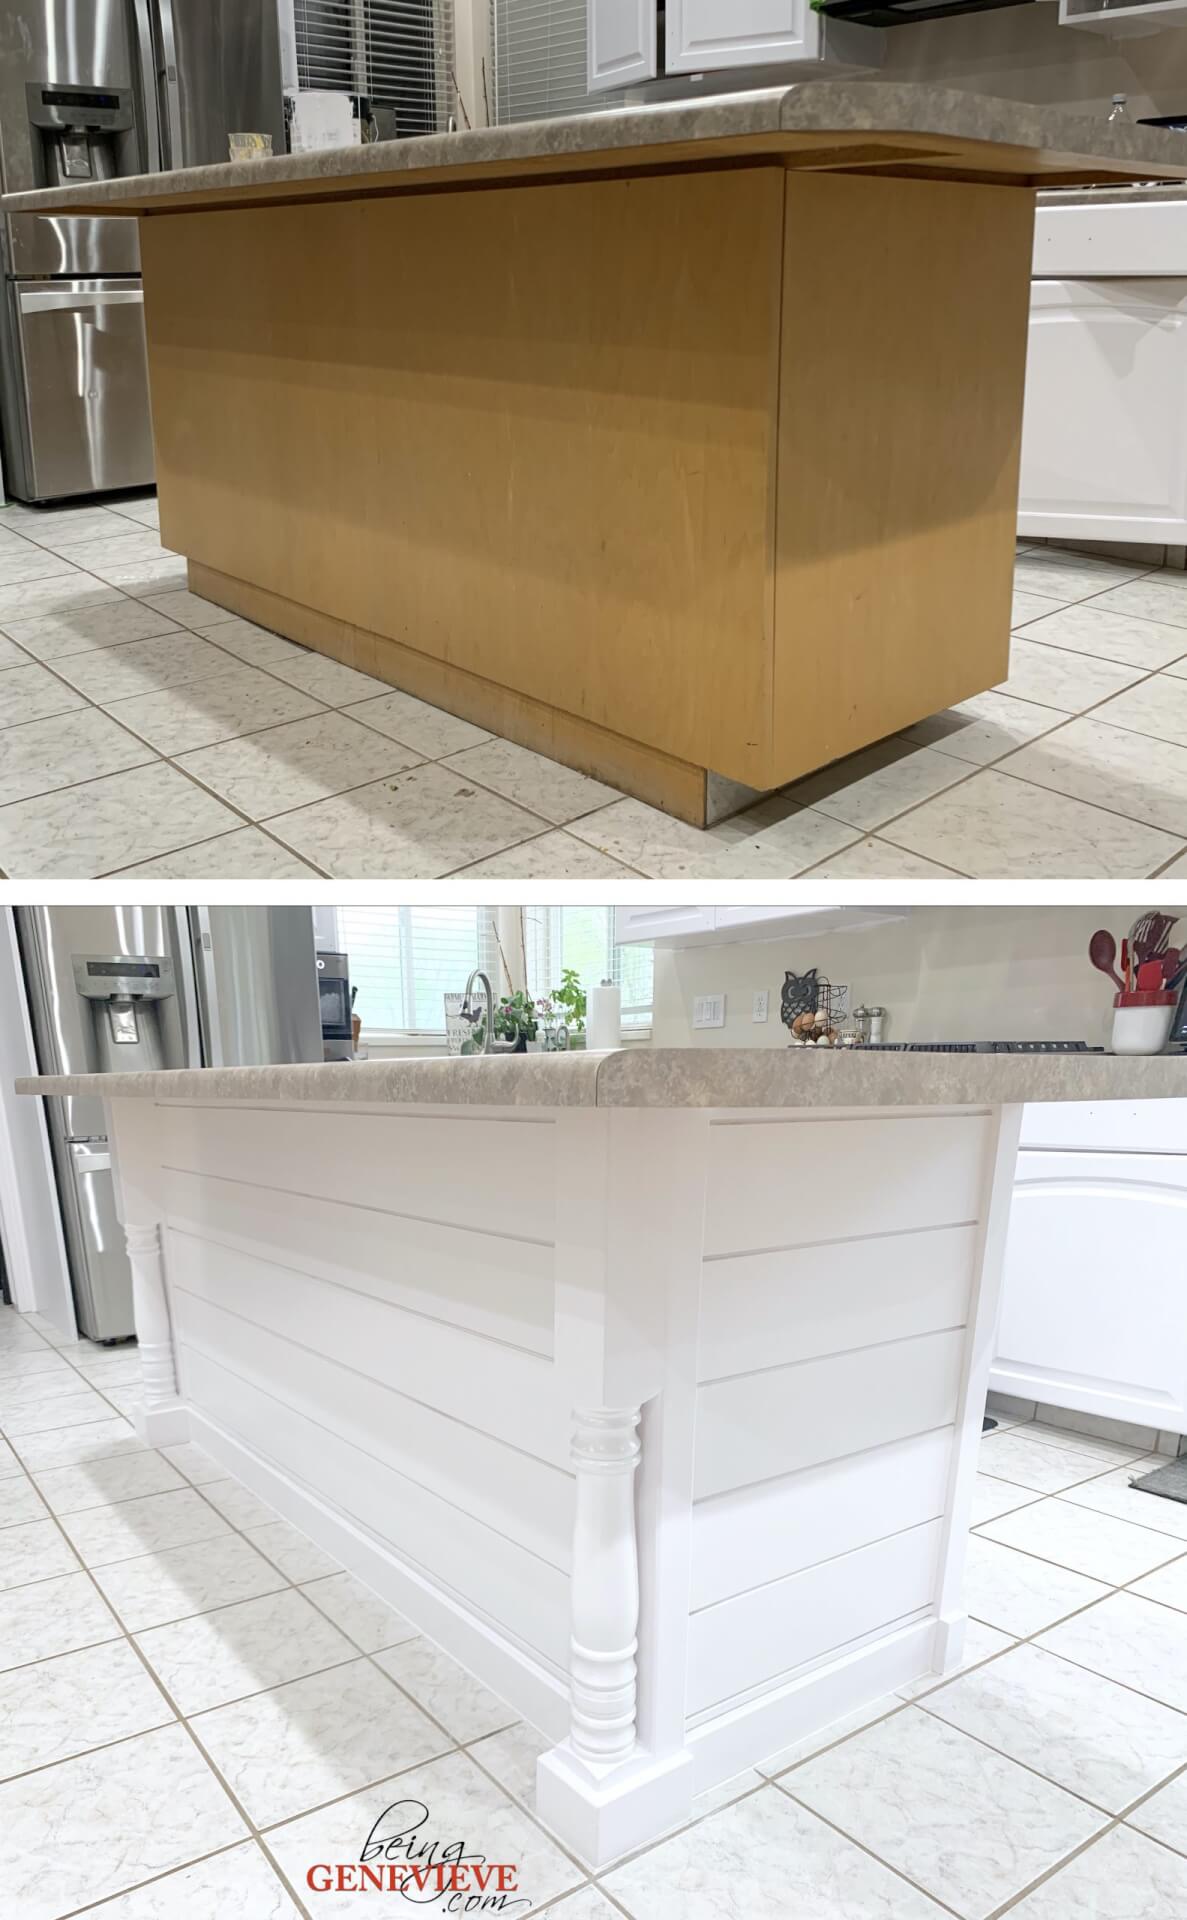
BEFORE

AFTER
I painted the cabinets white, changed out the hardware, and remodeled the island. Painting the cabinets and changing out hardware doesn’t require a tutorial to me, but remodeling the kitchen island I feel does. So here is how I did our island . . .
Supplies
- MDF 1/4″ Wood
- Old Wood Banister Posts
- Liquid Nails or Gorilla Glue
- 1″ x 2″ Boards
- 1″ x 2″ MDF Boards
- 1/2″ x 3-1/2″ MDF Boards
- Paint
- Nail Gun
Step 1: Paint Island
I started with painting a very rough first coat on the entire island. I only did this so that when it came to painting the entire island, after the shiplap, that painting in the little grooves would a little easier.

Step 2: Cut Shiplap
I created all of my own “shiplap” for this project. I cut several long strips with my table saw, making the strips 5-1/2″ wide.
Note: I cut all of my “shiplap” wood out of 1/4” thick MDF board. The MDF boards can be located next to the underlayment boards at Home Depot.
Step 3: Up-Cycling Old Banister Posts
Many years ago, my in-laws had new banisters put into their home. My mother-in-law asked if I would like their old banister posts or if they should just send them to the dump. I, of course, wanted them . . . Just think of all the possibilities I thought! Well after more than 5 years of storing (and moving) these posts I thought of the perfect up-cycle for them. 
First, I began by adding 1″ x 2″ boards (natural wood in picture) on the end sides of the island, next to where the banister post was going to be attached. I then added a 1/2″ thick MDF board that was the same width as the banister post, on the front corners of the island.

I cut the banister post to the height that I needed, with my miter/chop saw.

I decided that I wanted the banister post to be placed upside-down, with the top down. I attached it using liquid nails and securing it with tape to dry and setup over night.


Step 4: Side & Baseboard Trim
I began by measuring how wide the standard 1″ x 2″ board and the MDF board were together. I then used my table saw to cut an MDF board down to be that width. I attached it to the opposite corner, of the short sides, on the island.


I have to admit that this next part was one of the parts I was most excited to change … the “toe kick” on the short sides of the island. I felt like it wasn’t necessary since the top of the counter extended out much farther than the island. So the toe kick was just an eye sore.
I started with cutting a piece of 3/4″ plywood to the same depth as the toe kick. I then attached it to the inside top of the toe kick. This was to help give the base trim something to attach to.


Once that is attached. I used the nail gun to attach the base trim on all 3 sides of the island. (I only did 3 sides, because the 4th side has drawers.)

This step is probably optional. I decided I wanted a little more added detail and interest to the base trim on the island. So I added base trim to the banister post areas and to the other corner, of the short sides, on the island. (Wow that was hard to explain, I really hope that made sense. If not, just view the pictures below and see everywhere that base trim was added.)


Step 5: Shiplap
Now just begin using your nail gun to attach your “homemade shiplap”.
Note: I found the center (from top to bottom) and added the center shiplap piece first. That made it so my top and bottom shiplap pieces were the same width since they needed to be cut down and would be skinnier than all the other shiplap pieces.


Step 6: Paint Prep
Now begin using putty to fill in all the nail holes and any other area where it isn’t a seamless finish. After your putty is setup and dry, sand it down and remove all the dust.


When it comes to removing dust from shiplap, I found that compressed air worked the best. I also used a very damp old cloth to wipe down everything.

Once the dust is removed, you can begin caulking all the little cracks where the shiplap and trim meet.
Caulking is very therapeutic to me. I could caulk different things for hours and love every minute of it … I know kind of weird. New to caulking? Here are my Caulking Tips.

Step 7: Paint
All that’s left now is to paint this beauty! YAY!

Tape off the edges with painters tape and begin painting.
My favorite white that I have found is the Behr Alkyd Semi-Gloss Enamel. I do about 2-3 coats of paint until it is to the look I like.

Look how amazing that before and after are … just some up-cycled banister posts, some “homemade” shiplap and a few pieces of trim. This beauty cost me less than $50 to remodel … Amazing!


